Here's The Dish!

Welcome to my website! I aim to provide my followers and fellow college students with some yummy, healthy, low budget recipes. I will also list ways to save money but also slim your waist!
No one wants to add the infamous college 10, 20 pounds!

Lets start cooking and if you have any questions please feel free to email me at evelynscollegecooking@gmail.com.

Sunday, June 24, 2012

Budget Savvy: Spa & Fondue Date Night IN

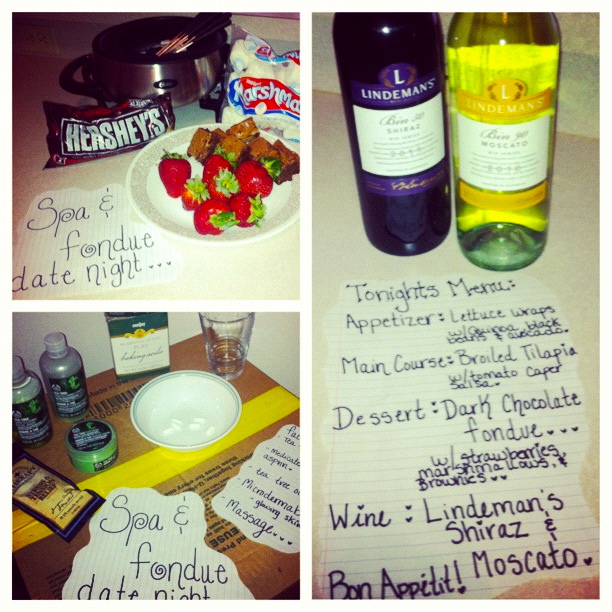
My little handmade menu and spa set up! Budget Savvy Date Night In! Make life fun :)

It seems like everyone is on a budget these days, and if you are not (lucky), why not save a little extra money from time to time? This past weekend was my weekend for date night, and I wanted to do something fun, out of the ordinary, and economical. Like most college students I try my best to stay on a really tight budget and when date night comes around you can spend upwards of 50.00 (and I am thinking that is a low number.) When you factor in a decent restaurant with food, adult beverages, and dessert you are looking right around 30 bucks. Then there is the movie which tickets now-a-days can start right around 9-10 bucks? And the candy, popcorn, soda, oh my... I lost count. Thank god I am not a finance or business major ;).

But in all seriousness it gets a little pricey. 

I got a fondue maker a few years ago, and I have been just dying to use it. Ironically, my boyfriend and I had just talked about the Melting Pot restaurant and then -ding- it just hit me, why not bring the Melting Pot to our home? Seemed like the right thing and budget-friendly thing to do. So once the idea popped in my head, I began planning. 

The first thing to do is plan out your menu-- look for things that you already have in the pantry to incorporate into the meal. For example, I had tilapia, and quinoa I wanted to use. Once I figured out what I wanted to make I drew out a menu. Literally, created my own little menu on some of my class notebook paper. Haha...

This was what I made. Click on the links for the recipes. 

I could barely snap a picture before it was gone. Check out the recipe I attached the links above.


Everything was a huge hit, simple to make and extremely economical. I was even able to get two bottles of Australian wines for only 10 buckaroos! 

The next order of business was my homemade Spa. I used homemade remedies I found on Pinterest. Click on the links to find the tutorial.

Spa:

- Tea Tree Oil face wash (The Body Shop). Use whatever face wash you have to take off your make up.


- Tea Tree Oil Face Mask (The Body Shop).


- Massage

Green Monsters. Haha.


Haha we are dorks.

 Then MOVIE! Rent a Redbox or watch one on Netflix!


Other cheap date night ideas:

Picnic under the stars-- bring a lantern and bug spray!
Aspirin Scrub.
Scary Movie night-- have a popcorn bar. Popcorn is extremely inexpensive and a fun way to experiment with different toppings check it out here.
Paris Date Night- Pop open a bottle of champagne, and eat cheese, meats, and crackers! Yumm.  


Attached below are some of my favorite date night ideas I found on Pinterest.


Thirty Things From Hopes AND Dreams. (Jason and I did this AND LOVED IT!)

Kisses! Enjoy a date night and being budget savvy!


Saturday, June 23, 2012

Dark Chocolate Fondue


Oh. M. G. Watch out people, this stuff should be called Dark Chocolate Fon-die! Literally this is chocolate to die for. So here is the story, I got this fondue maker two years ago. TWO YEARS AGO, and I have been just dying to use it. So when I planned this date night in "Spa and Fondue Night", I knew that fondue had to be on the menu.

As I mentioned in my earlier posts I planned a date night in for Jason and I last night. I wanted to do something creative, fun, and economical. We all know that dates can get pretty pricey these days when you factor in drinks, meals, dessert, movies or whatever you do. So I made dinner. I knew that I wanted to use my fondue maker for some delectable so the appetizer and main course was a lighter meal, on the healthy side so we could indulge in some dark chocolate slap-yo-mama good fondue.

So surprise your honey next date night with this ooey-gooey-deliciousy-delicious fondue dippin' fun! BUT before you go and by yourself a fondue maker, stop you can use the good ol' fashion stove top or "cookin' range" like we call it here in Texas! I do recommend getting yourself a fondue maker though someday, they are just good fun had by all!


Dark Chocolate yumminess!


Okay, okay. Here's what ya need:

Ingredients:

1 12oz bag of Dark Chocolate
1 8oz thing of Heavy Cream
1/2 Tablespoon Almond or Vanilla Extract (Check variations below)
Shake or two of some cinnamon

Dipping Ideas:

Brownies
Marshmallows
Strawberries
Graham Crackers
Cookies

To-do:

1) Place the cream in your fondue maker or pot (if using a pot, I recommend doing a double boil or placing the heat on low).
2) Wait for the cream to start to slowly bubble NOT boil.
3) Add dark chocolate, almond extract, and cinnamon.
4) Mix with a spoon.
5) Get your skewers and the things you wanna dip, and dip a way my friends!

Variations:

Instead of almond extract use: Baileys and Cream, Orange Extract, or Mint Extract (experiment-- its all part of the fun!)

Delicious. I could barely snap a picture before we started chowing down!

Nom nom nom
I love this man. The BEST part of this date was that we stayed in our Pj's HEAVEN!

White Wine Tomato & Capers Tilapia


Yep, you read it right-- whitee winee. If you don't know anything about me, the first thing you should know, is that I am a HUGE wine-o. Don't judge me, or do. Its just who I am. And when I can cook with wine? Ah, I am sold. Adding a little wine makes everything better! :)

I paired this recipe with my previous post, Black Bean & Avocado Quinoa Wraps (to die for) click the link to view the recipe or you could add steamed broccoli or asparagus. Anyways, last night was my night for date night and to save money, I figured we could do date night IN! Which is one of my all time favorites. And since dessert was dark chocolate fondue (amaze, don't worry I will most def post it) I figured I should do a lighter appetizer and main course.

Jason and I are health FREAKS minus the fact he killed the rest of the sugar cookies this morning, hey you gotta live from time to time right? Anyways, we try and eat healthy its just part of our lifestyle and one of our favorite things to make and eat is tilapia. Low fat and an excellent source of protein.

I love cooking tilapia because it is healthy and so much cheaper to prepare than salmon. We try and stay within a pretty tight budget and cooking with tilapia gives us the top-of-the-line expensive dinner feel on a college student budget.

This recipe, like the majority of my recipes, is healthy, easy to make, and budget savvy. Enjoy-- I know we did! :)


Black bean and avocado quinoa wraps & the white wine tomato tilapia! Yummy!


Ingredients:

1 Bag Farm Raised Tilapia
1 Roma Tomato Diced
1 Tablespoon Minced Garlic
1-2 Tablespoons Capers
2 Tablespoons White Wine (or white wine vinegar)
Salt
Pepper

To do:

1) Place your oven on broil.
2) On a cookie sheet or jelly roll pan, place some aluminum foil or wax paper down. Spray the pan and spread out your tilapia. Sprinkle a little salt, pepper or if you want some seasonal on both sides of the fish.
3) While the oven is heating, in a small mixing bowl mix the diced tomato, garlic, wine, and capers.
4) Place the tilapia in the oven for 5-6 minutes on each side.
5) When each side has been cooked, take the tilapia out of the oven and spread the tomato-caper-wine mixture on top of the fish.

Enjoy!

Black Bean & Avocado Quinoa Wraps

"These are a few of my favoritee things" :)
These wraps are perfect as a fresh appetizer or a delicious lunch. My favorite thing about these, is that they are packed with all of my favorite, healthy ingredients. I made these for a budget savvy date night appetizer for my boyfriend. Though he is not a "veggie" person, he LOVED them! I figured since we would be ending the night with dark chocolate fondue I should make the appetizer and main course healthy.

So as usual, these wraps are extremely healthy, easy to make, and budget savvy. A perk to these wraps is that I use quinoa instead of brown or white rice. In fact, I recommend adding more Quinoa into your diet instead of white rice and brown rice. The reason being is that quinoa has a higher protein content, low sodium, and is gluten free. Quinoa is also low in fat and calories. It is high in fiber and other nutrients such as magnesium and iron. Be careful though, quinoa is still a carbohydrate but a better source of carbs than rice, potatoes, bread ect. Many vegetarians incorporate quinoa in their diet due to the high protein content. Click here to view nutrient data base on quinoa.

I also use Pace Salsa not only does Pace taste GREAT it is GREAT for you. Low calories, fat, carbs, and better yet, it is also gluten free. A big shout out to Pace for making one great-affordably-delicious product! If you scroll down you will see a few (of the many) Pace Salsa jars that we have used. You just can't have enough Pace! :)


We obviously love Pace Salsa: Gluten Free!
All mixed up :)
Mmm proof that healthy can be delicious. If my boyfriend will eat 'em its gotta be good. Picky eaters...!


Ingredients:

1 Cup Chopped Vidolia Onion
1 Diced Orange Bell Pepper
1/2 Can Organic Black Beans
1 Diced Avocado
1 Cup Salsa
1 Cup Cooked Quinoa
1 Head of Iceberg Lettuce

To do:

1) Cook quinoa according to the box or bag. I use TruRoots Organic Quinoa.
2) While your quinoa is cooking prepare your onions, avocado and bell pepper.
3) In a large mixing bowl mix everything together.
4) Wash your iceberg lettuce and then rip off piece, place the mixture into the lettuce and chow down!

Yummy! Healthy! Easy-peasy!


Strawberry Cake Cookies


I have been going through a little dry spell with posting lately. It has been quite the busy summer with work and lots of school. I swear its like dancing backwards in high heels, or cowgirl boots. I graduate in December (que the hallelujah song) and making sure everything is set for graduation has been taking up the majority of my time.

Now if only I could find a "big girl" job. I am entering the "REAL WORLD" as if its not real enough in college. Sorry I am rambling. Needless to say, I have been cooking a ton of delicious things for my boyfriend, his roommates, friends, and family I just haven't find the time to do what I love most, blog!

I love this recipe because, there are so many variations, it makes a ton of cookies (which is great for parties or hungry boys), it is extremely economical, and something quick and easy to make with the kids, friends, or significant other. Heck, its a quick and easy recipe to make by yourself!

Now this is not one of my healthy recipes, but I figured since it is a budget savvy recipe I would post it. Summer seems to be filled with cookouts, dinners, picnics, and various gatherings, and this recipe is so versatile and inexpensive it just seems like the perfect fit.

Jason and I try and budget our money but he was surprised when I asked him what type of cookie I should make, I choose strawberry. So this recipe is for the strawberry cookies I made but below I will listed a few alternative ideas if strawberry isn't your thing!

Note: If you have a cookie loving boyfriend HIDE THE COOKIES BEFORE THE PARTY! Or else they might just be gone before! 

Scroll down for healthy variations and other cookie ideas.  


Ingredients:

1 Box Strawberry Cake Mix
1 Teaspoon Baking Soda
2 Eggs
1/2 Cup Oil (of choice)
1 Tablespoon Almond or Vanilla Extract
Any extras: white dark chocolate, nuts, dried fruit ect. I made my plain to save even more money. They were delicious plain!

To do:

1) Preheat the oven to 350.
2) Sift together the cake mix and baking soda.
3) Stir in the eggs, oil, and almond extract.
4) Add any of your extras!
5) Place on wax paper or aluminum covered cookie sheets and place in preheated oven for about 10 minutes.
 
Enjoy!

Healthy variations:

- 1 Cup greek yogurt and 1/4 cup water.

Other cookie ideas:

- Vanilla cake mix, same recipe, with mini chocolate chips.
- Chocolate cake mix, same recipe, and add peanut butter chocolate chips.
- Vanilla cake mix, same recipe, add sprinkles on top. Perfect for a birthday party!


Try my cream cheese frosting on top!

Cream Cheese Frosting Ingredients:

1 8oz Cream Cheese (I use the low fat kind)
1/4 Stick Butter
1 Teaspoon Vanilla or Almond Extract
1 Box Powder Sugar (taste as you go!)

Mix all ingredients together. And spread on a cooled cake. I place my cake in the freezer for about 20-30 minutes before I add the frosting.

Thursday, June 21, 2012

Grandma's Banana Cake


This banana cake reminds me of summer up in northern Michigan with my family. Rather a summer long family reunion. This reunion would not be complete without Grandma's Banana Cake, sitting on the porch, and watching the beautiful Bay View Michigan sunsets. My Grandma gave me this recipe three summers ago and I have made it every summer since. It is so easy to make and I bring it to cookouts and gatherings ALL THE TIME. My boyfriend loves it and likes to help bake. So it is fun to make and something that your kids or significant other can cook together. I have been making this cake for years, and while it may not be the "healthiest" choice it is extremely economical and better yet, delicious. I promise this will be a HUGE hit at the next gathering or for a treat for your family.

Cake Ingredients: Add Almond Extract. You won't be disappointed. 


Cake Ingredients:

1 Box Yellow Cake Mix
2 Teaspoons Baking Soda
1 Cup Water
2 Eggs
1 Cup Mashed Bananas** (I use about two-three)
2 Tablespoons Oil (Grape Seed oil works or you can sub in applesauce)**
1 Tablespoon almond extract (optional-- but SO good. My little addition.)

To do:

Preheat oven to 350. Mix your bananas first. I like to use a hand blender and really blend the bananas so there are not any chunks. Then mix in water, eggs, oil. Mix until creamy and then add in the cake mix and baking soda. Place in a greased 9x13 inch pan and place in oven for about 35-40 minutes.

Scroll down for the Cream Cheese Frosting recipe!

Blend your bananas so they are chunk free!
Add in the rest of the wet and then the dry ingredients. 
Pour in 9x13 greased pan. Cook on 350 for 35-40 minutes.
Let cool in the freezer before you put the frosting on!


Cream Cheese Frosting Ingredients:

1 8oz Cream Cheese (I use the low fat kind)
1/4 Stick Butter
1 Teaspoon Vanilla or Almond Extract
1 Box Powder Sugar (taste as you go!)

Mix all ingredients together. And spread on a cooled cake. I place my cake in the freezer for about 20-30 minutes before I add the frosting. 

Cream Cheese Frosting!
So YUMMY!
Variations:

Instead of oil: you can add in unsweetened applesauce (about 1/4 cup).
Instead of regular cream cheese: use low fat or non fat.
Bananas: you can use your old bananas! Don't be wasteful :)

You know that expression, "if its not broke, don't fix it?" It totally applies to this recipe, sure I try and make healthy alterations all the time but a good thing in moderation WON'T kill you! So enjoy yourself and this moist, delicious banana cake. We even have it for breakfast sometimes... Guilty.

Enjoy and let me know what you think!

The Bay View Sunset's I was talking about <3 Gorgeous.
Big smiles-- enjoy the cake as much as we do!


Monday, June 11, 2012

Evelyn's Healthy Almond Chocolate Protein Shake


Better than a chocolate shake!

No, no this is not dessert but, it might as well be because this protein shake is such a treat! I have been meaning to post this (along with a few other recipes) for a long time now. I just have been so busy with my summer classes. I make this shake a lot. Especially when I am busy. It takes virtually five minutes to make and is great after a long workout or a meal on the go. Not to mention, with the heat being at record highs, this is a tasty-healthy-filling way to cool down.

Ingredients:

1 Medium Banana
1 Cup Dark Chocolate Almond Milk
1-2 Tablespoons Almond Butter (I use MaraNatha No Stir All Natural)
1 Scoop Chocolate Protein Powder (Optional-- if I am using protein powder I do not use as much almond butter)
1/2 Cup Ice (about 5 medium sized cubes)

To-do-

Place all ingredients in your blender and blend until smooth! Place in a large glass and enjoy!

Variations and additions:

Instead of Bananas: add in some strawberries for a chocolatey strawberry treat.

Add: flaxseed, protein powder, fibers, ect.

Saturday, June 2, 2012

Vegan Skinny Monkey Cookies: Oatmeal Peanut Butter Banana Chocolate Chip Cookies


Ever heard of Chunky Monkey Cookies? Ever tried one? One word, delicious. Though after eating a few of them, you begin to feel like a "chunky monkey" with all the fattening butter, eggs, oils, sugars, and flour...


These "Skinny Monkey Cookies" taste just like the original but are so much better for you. The ingredients are so simple, you can whip them up on a short notice! In fact, the majority of the ingredients are bound to be in your pantry.

Poor J wasn't hear to lick the batter. I actually had enough to make the full serving this time! :)

Instead of butter, eggs, and oils I used bananas. Like I've mentioned earlier in my healthy Banana Bread recipe, I virtually do not buy butter anymore. I just do not see the point in adding all of the fat and calories when a simple banana can do the trick! Not to mention, bananas are much cheaper to buy. No brainer, go with the banana substitute.

I didn't have mini chocolate chips in the pantry so I placed 1/2 C in a bag and broke 'em up using a spoon! Folded them into the recipe last. Still yummy and chocolatey!
I made these cookies for Jason's mom's graduation. Such an achievement and a women I look up to. Her wisdom has always been a guiding light for me. To show her my love and admiration, I thought these Skinny Monkey Cookies would do just the trick! Healthy, delicious, and made with love!


Jason was working when I made these, without him "tasting the batter" (eating it), I was able to make 26 cookies! Yummmm. Don't forget to check out the variations and tips below! Also check out these cookies for another healthier version of oatmeal cookies.

Nom, nom, nom! To bad I did not snap a picture of the finished wrapped present. Of course it had a pink bow and bedazzled card, so me!


Ingredients:

Wet-

3 Bananas (Mashed, best if use a hand mixer)

1 Cup All Natural Chunky Peanut Butter

1 Tablespoon Vanilla Extract

4 Tablespoons Organic Honey

Dry-

1/2 Cup Whole Wheat Pastry Flour

2 Cups Whole Grain Oats

1 Teaspoon Baking Powder

1 Teaspoon Salt

1/4 Cup Mini Chocolate Chips

To do:

1) Preheat oven to 350.

2) Using a hand mixer or standing mixer, mash up the bananas and add the rest of the wet ingredients (peanut butter, vanilla, and honey).

3) In a separate bowl combine and whisk together all of the dry ingredients. This insures that all of the dry ingredients are evenly distributed.

4) Combine the wet and dry ingredients together.

5) Using a cookie dough dropper place dough on a PAM sprayed cookie sheet, place in the oven for 12-15 minutes and enjoy this deliciousness!

Variations:

Natural Crunchy Peanut Butter- Use Creamy Peanut Butter, Reduced Fat, or Almond Butter.

Organic Honey- Use Organic Agave or Sugar Free Maple Syrup.

Vanilla Extract- Try Almond Extract.

Whole Wheat Pastry Flour- Use Almond Flour, Buckwheat, or Protein Powder (Let me know what the protein powder kind tastes like if you opt for this, I am really interested in trying them.)

Chocolate Chips- I like cutting chocolate chip recipes in half by using mini chocolate chips (ex. a recipe calls for 1 Cup, I use 1/2 cup of the mini's). You can definitely add different types of chocolate chips to this recipe. Or other options such as dried fruit or nuts.


Sunday, May 27, 2012

Lemon Basil Tilapia


Lemon Basil Tilapia, one of my summer favorites! Tilapia is low in fat and a great source of protein. Not only is tilapia healthy for you it is also inexpensive compared to salmon. So there ya have it-- easy to make, delicious, and inexpensive? Sounds like a win to me!


Cooking fish during the summer time is a must. Fish is light meal that is perfect paired with a glass of wine, good company, and dinner outside on the patio. I also like cooking with citrus for a burst of healthy, natural flavors! So pairing the two together seemed like a great idea!


This is hardly a recipe, and more of a method due to how easy this. Make this for the next date night! Instead of going out, stay in with this recipe and large glass of wine.

Ingredients:

4 Fresh Water Tilapia Fillets.
2 Large Lemons
Basil Spice (I of course used my favorite, Penzey Basil Spice-- YUM!)

To-do:

1) Place oven on broil
2) Slice lemons into medium thick slices
3) Spray a cooking sheet with PAM
4) Place lemons on cooking sheet and add the tilapia on top
5) Sprinkle with desired amount of basil
6) Cook for about 12 minutes and then flip tilapia for another 10 minutes. Watch closely, you do not want to burn the tilapia.
7) Squeeze extra lemon on top if desired and add mixed veggies as a side dish. I used my Veggin' Out Skinny Girl Style mixed veggies recipe!

Evelyn's Skinny Style Chicken Salad


I have never made chicken salad before and after two tries within two days, I have a feeling I have perfected the art! My chicken salad is protein packed, and low in fat! Perfect for a picnic, lunch on the go, or a quick snack!

Like I mentioned in my previous post, my boyfriend is big into body building, physique, and eating! Eating healthy and extremely clean, sheesh spoiled boy. So I made this for him, the best thing about this recipe is that it makes a ton of chicken salad! You can make this at the beginning of the week, refrigerate, and quickly pack for lunches on the go! This would also be nice to bring to a summer backyard cookout or pool party. It is not too heavy and will keep the masses pleased!


I wanted to try and make this recipe as healthy as possible, I am sure I will keep modifying it over the years but for now-- I am obsessed! It is the perfect lunch or snack for a hot summers day. Not only is my chicken salad delicious it is most importantly healthy. I eliminated the use of mayo, which is packed with fat and calories. I gagged when I read the back... sorry 'boutcha Mayo... but no way, you are NOT going in my body!

Instead, I used a mixture of spicy brown mustard and fat free italian dressing. I hope you enjoy it as much as we did!

I added pretzels and fruit with my chicken salad today! Yum! Clean eating does a body good!


Ingredients:

6 Boneless Skinless Chicken Breasts
8 Boiled Eggs (Yokes taken out after boiled)
2 Chopped Celery Stalks
1/2-1 Cup Sauteed Sweet Onions (we are onion people, so I used about a cup)
1/4 Cup Green Onions/ Chives
1/4 Cup Dried Cranbries
Mrs. Dash Seasoning (your choice-- sodium free!)
1 Cup Fat Free Italian Dressing
2 Tablespoons Spicy Brown Mustard

To-do-
1) Place oven on broil.
2) Place eggs in pot, add water until its about an inch over the eggs, add a dash of salt, place on medium heat until it comes to a boil. Let eggs boil for one minute, then turn off heat and let sit for about 20-25 minutes.
3) While your eggs are cooking, season chicken breast with Mrs. Dash Seasoning. I use Mrs. Dash because it is sodium free and since I am adding spicy brown mustard and fat free italian dressing, we really do not need any extra sodium.
4) Place seasoned chicken in oven on broil for 12 minutes. Once timer dings, flip and cook for another 10 minutes.
5) Chop up onions and sauté on sprayed skillet pan.
6) Chop up celery stalks, add more if you'd like more.
7) After chicken has cooled- shred chicken (you can use a food processor if you'd like)
8) After eggs are cooled, peel off the shell, and take out the hard yellow yokes (this reduces the fat)
9) Place sautéed onions, celery, cranberries, shredded chicken, and egg whites into a large mixing bowl.
10) Mix in fat free italian dressing and spicy brown mustard. Then refrigerate chicken salad for at least two hours before serving-- I think it tastes better if you let it sit overnight!  

Healthy-Easy-Banana Bread, Oh My!

All breads are not created equal!
I found this recipe on Pinterest a long time ago and have been meaning to make it! I love this recipe because all of the ingredients are readily available, its economical, healthy, and better yet, delicious. I am interning this summer and have moved in with my boyfriend (oh my) and let me tell you, this boy can eat. He and I are also health food freaks, we love to cook healthy and eat clean. I constantly look for healthy recipes that not only are good for your waistline but delicious.


This recipe could not have come at a better time, my boyfriend has been on a extremely strict diet for the past three-four (forever) months, and has gone without bread and "treats" to prepare for his Physique Competition. His hard work payed off when he won his class, and it was about time he loaded up on some carbs! This is where I step in! 

Penzey Spices make everything taste better.
I love bread, and the BEST thing about this bread is that there is no butter, oils, or granulated sugar. Instead you use unsweetened apple sauce and honey! Mmm two of my favorite and most used ingredients. I virtually do not buy butter anymore. Its not that I am anti-butter but if you can go without the calories and fat, why not?


This bread is also super moist, easy to take on the go, a great way to carb up before a workout, makes a large batch, and picky boyfriend approved! Sounds like a winning combination to me. Sorry there is only one picture, after I made it I snapped a quick shot and before I knew it-- It was all gone!

Check out 8 Weeks to a Better You Blog for yummy smoothie & breakfast ideas! 

So delicious, it will be gone within two days!


Ingredients:

3 Mashed Bananas (ripe-or brown, both work just fine!)
2 Cups Whole Wheat Pastry Flour
1 Teaspoon Baking Soda
1/4 Teaspoon Salt
2 Teaspoons Penzey Ground Cinnamon
1/2 Cup Unsweetened Apple Sauce
3/4 Cup Honey
2 Eggs Beaten

To-do:

1) Preheat the oven to 350. Grease a medium square cake pan or bread pan.
2) Whisk dry ingredients together: flour, baking soda, salt, and cinnamon.
3) Mash the bananas, and mix in honey, apple sauce, and eggs.
4) Place in the oven for 45-50 minutes if using medium cake pan, for bread pan try 55-60 minutes!

Enjoy this delicious bread for breakfast with almond butter on top or plain with a side of fruit!